Ideas for a birthday card DIY: unleash your inner artist and craft a greeting that’s as unique as the birthday star! Forget those mass-produced, emotionally vacant cards – we’re diving headfirst into a world of personalized paper perfection. From whimsical watercolors to elegantly embossed masterpieces, we’ve got the blueprints for crafting a card that’ll leave the recipient speechless (and possibly a little teary-eyed, in a good way!).
Prepare for a crafting adventure filled with textured backgrounds, layered delights, and embellishments galore. Get ready to make a card so stunning, it might just steal the show from the birthday cake itself!
This guide is your all-access pass to birthday card brilliance. We’ll cover everything from choosing the perfect paper stock (yes, it matters!) to mastering those tricky die-cut designs. Whether you’re a seasoned crafting pro or a complete beginner, you’ll find inspiration and easy-to-follow instructions to create a card that truly reflects the personality of the birthday celebrant. Get ready to personalize, embellish, and impress!
DIY Birthday Card Design Ideas
Unleash your inner artist and create personalized birthday greetings that are as unique as the recipient! This section explores diverse card design ideas, catering to various skill levels and age groups. From simple elegance to intricate detail, we’ve got you covered.
Five Unique Birthday Card Layouts
These five designs showcase diverse aesthetics and cater to different age groups. Consider paper weight and texture to elevate the final product.
- Toddler’s Delight (Ages 1-3): Bright, bold colors (reds, yellows, blues). Simple shapes like circles, squares, and stars. Thick, textured cardstock for durability. Consider using chunky glitter glue for added tactile appeal.
- Kid-Friendly Fun (Ages 4-8): Vibrant color schemes with playful fonts. Illustrations of favorite animals or cartoon characters. Use slightly thinner cardstock for easier crafting and coloring.
- Tween Appeal (Ages 9-12): Modern, minimalist designs. Pastel color palettes or trendy color combinations (like teal and rose gold). Smooth cardstock with a subtle sheen.
- Teen Trendsetter (Ages 13-19): Geometric patterns, abstract art, or photographic elements. Use of metallic accents or foil stamping. High-quality cardstock with a smooth finish.
- Adult Elegance (Ages 20+): Sophisticated color palettes (muted tones, jewel tones). Floral designs, elegant calligraphy, or watercolor washes. High-quality textured cardstock or watercolor paper.
Three Intricate Card Designs
These designs incorporate advanced techniques for a truly stunning result. Prepare for some precision crafting!
- Die-Cut Wonderland: Use a variety of die-cuts (flowers, butterflies, geometric shapes) to create a layered, three-dimensional effect. Arrange the die-cuts on a base card and adhere them using foam adhesive for added dimension. Consider adding subtle shading with colored pencils or markers.
- Embossed Elegance: Use an embossing folder and an embossing machine to create a textured background on your card. Experiment with different embossing powders for a unique look. Pair this with a simple, elegant sentiment.
- Layered Laser-Cut Design: Use a laser cutter (or purchase pre-cut laser-cut elements) to create intricate designs. Layer these elements on a base card, creating depth and visual interest. Consider using different colored cardstock for each layer.
Five Simple Yet Elegant Card Designs
Perfect for beginners, these designs require minimal supplies and effort, yet deliver maximum impact.
- Clean Lines & Bold Colors: A simple rectangular card with a bold colored border and a minimal handwritten message. Use high-quality cardstock.
- Watercolor Wash: Create a simple watercolor wash background on watercolor paper and let it dry. Add a simple sentiment in a contrasting color.
- Photo Collage: Arrange a few small photos of the recipient on a card base. Add simple embellishments, like small ribbons or stickers.
- Geometric Shapes: Use a stencil to create geometric shapes on your card using different colored inks or paints. Add a simple handwritten message.
- Simple Stamped Design: Use a simple stamp and ink pad to create a repeating pattern or a single focal image on your card. Add a handwritten message.
Simple Card Designs Table
A quick visual reference for the five simple card designs.
| Design | Description |
|---|---|
| Clean Lines & Bold Colors | A minimalist design featuring bold colors and clean lines, emphasizing simplicity and impact. |
| Watercolor Wash | A delicate design showcasing a hand-painted watercolor background, offering a soft and artistic feel. |
| Photo Collage | A sentimental design incorporating cherished photographs, creating a personalized and heartwarming touch. |
| Geometric Shapes | A modern and stylish design using geometric shapes, offering a clean and contemporary aesthetic. |
| Simple Stamped Design | A classic and versatile design featuring a simple stamped image, adding a touch of elegance and personalization. |
Crafting Techniques for DIY Cards: Ideas For A Birthday Card Diy
Mastering these techniques will transform your card-making skills. From textured backgrounds to personalized messages, these methods elevate your creations.
Three Methods for Creating Textured Backgrounds
- Embossing: Use an embossing folder and embossing machine to create raised designs on your cardstock. This adds depth and visual interest.
- Dry Brushing: Apply paint to a stiff brush, then lightly brush across the cardstock in a sweeping motion. This creates a subtle, textured effect.
- Sponge Painting: Dab different colors of paint onto a sponge, then gently dab it onto the cardstock. This creates a mottled, textured effect.
Layered Card Design
Creating layered cards adds depth and visual interest. Precise layering is key to a professional finish.
- Choose your papers: Select patterned papers and cardstock in coordinating colors and patterns.
- Cut and layer: Cut your patterned papers into various shapes and sizes. Layer them on the card base, adhering each layer with adhesive.
- Add embellishments: Add embellishments such as ribbons, stickers, or gems to enhance the design.
- Finishing touches: Add a personalized message to complete your layered card design.
Two Techniques for Adding Personalized Messages, Ideas for a birthday card diy
- Hand-lettering: Practice your calligraphy or hand-lettering skills to create a unique and personal message. Use different pens or markers for varied styles.
- Stencils: Use stencils to create crisp, clean lettering or designs on your card. Use paint, ink, or embossing powder for a variety of effects.
Five Embellishment Ideas
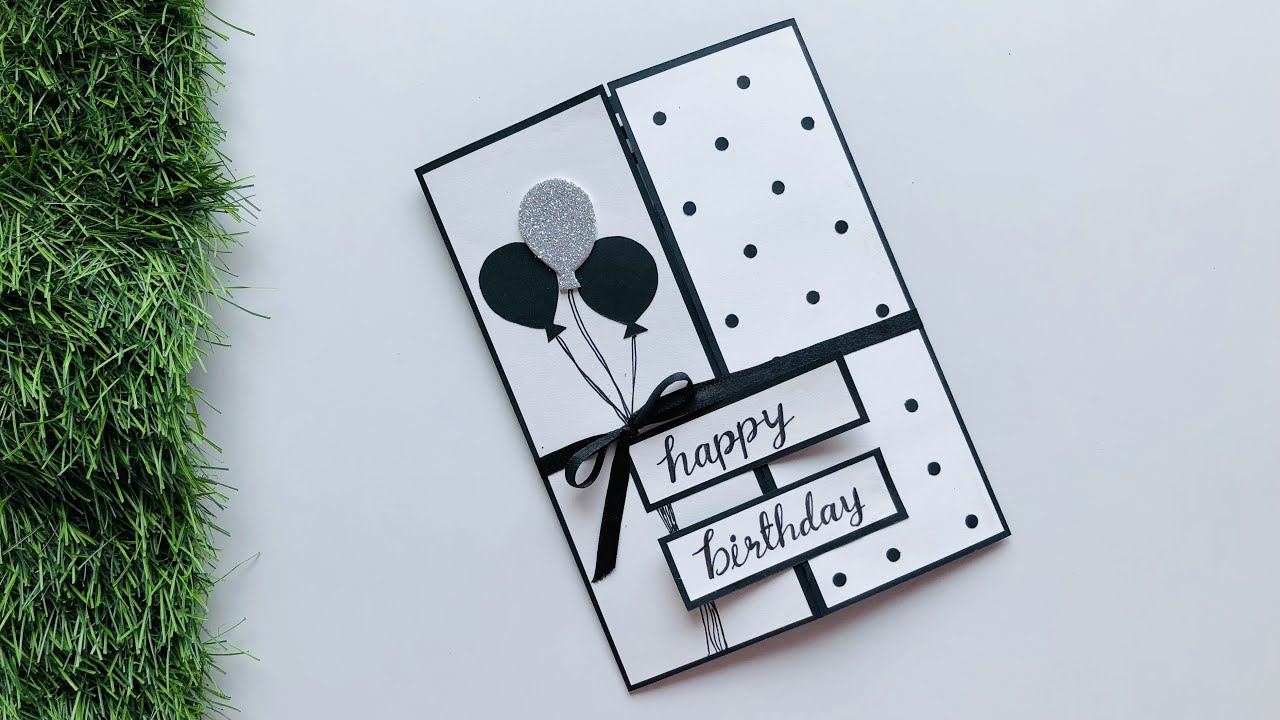
- Ribbons: Add a touch of elegance with ribbons, tying them into bows or weaving them into the design.
- Glitter: Sprinkle glitter onto wet adhesive for a sparkly touch. Use fine glitter for a subtle effect or chunky glitter for a bolder look.
- Stickers: Add pre-made stickers to complement your design. Choose stickers that match the overall theme and color scheme.
- Gems: Add small gems or rhinestones to create focal points or add sparkle to your design.
- Dried Flowers: Incorporate pressed dried flowers for a unique and natural touch.
Material Selection and Sourcing
Choosing the right materials is crucial for a successful DIY project. This section explores material combinations, readily available options, and sourcing strategies.
Five Unique Material Combinations
- Kraft paper + twine + dried flowers: Rustic and elegant combination.
- Watercolor paper + metallic accents + calligraphy: Sophisticated and artistic.
- Bright cardstock + glitter glue + stickers: Fun and playful.
- Patterned paper + die-cuts + ribbons: Layered and dimensional.
- Black cardstock + white ink + embossing powder: Modern and minimalist.
Five Readily Accessible and Affordable Materials
- Cardstock
- Construction paper
- Markers
- Glue
- Scissors
Pros and Cons of Different Paper Types
Understanding the properties of different paper types will help you make informed choices.
- Cardstock: Pros: Durable, comes in various colors and textures. Cons: Can be more expensive than other paper types.
- Watercolor paper: Pros: Ideal for watercolor painting, absorbent. Cons: Can be more expensive and less durable than cardstock.
- Construction paper: Pros: Affordable, comes in various colors. Cons: Less durable than cardstock.
Five Resources for Crafting Supplies
- Local craft stores (e.g., Michaels, Hobby Lobby)
- Online retailers (e.g., Amazon, Etsy)
- Discount stores (e.g., Dollar Tree)
- Specialty paper stores
- Online crafting communities and forums
Personalized Touches and Themes
Infuse your cards with personality and create designs tailored to the recipient. This section explores thematic ideas and personalization techniques.
Three Birthday Card Themes
- Floral: Use floral patterns, images, or embellishments. Consider incorporating the recipient’s favorite flower.
- Geometric: Use geometric shapes, patterns, and colors. This theme is modern and versatile.
- Whimsical: Use playful fonts, bright colors, and quirky illustrations. This theme is perfect for children or those with a fun-loving personality.
Five Ways to Personalize a DIY Birthday Card
- Incorporate their favorite colors: Use colors that the recipient loves.
- Use their name or initials: Add a personal touch by including their name or initials.
- Include an inside joke: Add a personal touch by including an inside joke.
- Write a heartfelt message: A thoughtful message is always appreciated.
- Use their favorite quote: Incorporate a quote that resonates with the recipient.
Five Creative Ideas for Incorporating Photos or Mementos
- Photo collage: Create a collage of photos of you and the recipient.
- Mini photo album: Attach a mini photo album to the card.
- Ticket stubs: Attach ticket stubs from a memorable event.
- Pressed flowers: Incorporate pressed flowers from a special occasion.
- Handwritten letters: Include a small handwritten letter or note.
Creating a Custom Birthday Card
Designing a card based on the recipient’s preferences adds a special touch.
- Identify their favorite colors: Choose a color palette that reflects their taste.
- Determine their preferred style: Choose a design style that matches their personality.
- Select appropriate materials: Select cardstock, embellishments, and other materials that complement the design and color scheme.
- Create the design: Assemble the card elements, ensuring a cohesive and visually appealing result.
- Add a personalized message: Craft a heartfelt message reflecting your relationship with the recipient.
Presentation and Packaging
The presentation of your handmade card is as important as the card itself. This section offers creative packaging and presentation ideas.
Three Ideas for Creatively Packaging a Handmade Card
- Decorative Envelope: Create a custom envelope using patterned paper or cardstock. Decorate it with embellishments to match the card.
- Small Gift Box: Place the card inside a small gift box, adding tissue paper and a small gift.
- Card Holder: Create a simple card holder from cardstock or wood, adding a personalized touch.
Two Different Card-Sized Gift Tags
- Simple Tag: Cut a small tag from cardstock and write a short message. Decorate it with a simple design.
- Layered Tag: Create a layered tag using different patterned papers and embellishments.
Creating a Simple Card Holder or Envelope
A protective holder elevates the presentation.
- Cardstock Envelope: Score and fold cardstock to create a simple envelope. Decorate the envelope to match the card.
- Cardstock Holder: Cut and fold cardstock to create a small holder that the card can stand in.
Creating a Decorative Gift Box

A decorative box adds an extra layer of presentation.
- Choose your materials: Select cardstock or patterned paper in a color that complements the card.
- Cut and score: Cut and score the cardstock or paper to create the box shape.
- Assemble the box: Fold and glue the pieces together to create the box.
- Decorate the box: Decorate the box with embellishments such as ribbons, stickers, or gems.
- Place the card inside: Place the handmade card and a small gift inside the box.
So, there you have it – a treasure trove of ideas to transform a simple birthday card into a cherished keepsake. Remember, the most important ingredient isn’t fancy materials or complex techniques, but the heartfelt sentiment you pour into your creation. Whether you opt for a minimalist masterpiece or a riot of colorful embellishments, your handmade card will speak volumes about your love and appreciation for the birthday person.
Obtain direct knowledge about the efficiency of easy things to make at home indian through case studies.
Now go forth, and create a card that’s as unforgettable as the celebration itself! Happy crafting!
Q&A
What’s the best glue to use for card making?
Acid-free glue sticks are great for most paper crafting, while liquid adhesive is ideal for heavier embellishments.
How do I prevent my ink from smudging?
Let ink dry completely before layering or adding embellishments. Consider using a heat embossing tool for extra durability.
Where can I find unique embellishments?
Check out craft stores, online marketplaces like Etsy, or even repurpose items from around your house!
How can I make my card more sturdy?
Use heavier cardstock, add layers for extra support, or consider adding a backing layer for stability.